A broken garage door spring is one of the most common issues homeowners face. Since the springs are responsible for lifting the heavy weight of the door, when they fail, your garage door becomes difficult—or even impossible—to operate. If you’ve ever wondered how to repair garage door spring without causing further damage or injury, this detailed guide will help you understand the process, the tools required, and when it’s best to call a professional.
Garage Door Springs Explained
Before diving into the steps of how to repair garage door spring, it’s important to know there are two main types of springs:
- Torsion Springs – Mounted horizontally above the door opening, these springs twist to provide lifting force.
- Extension Springs – Found along the sides of the door, these extend and contract as the door moves.
Both types experience wear and tear over time and can snap due to frequent use, rust, or poor maintenance.
Signs You Need Garage Door Spring Repair
Recognizing the early warning signs will help you take action before the problem worsens. Some common signs include:
- Door opens partially and then stops
- The garage door feels unusually heavy
- Loud bang or snapping sound from the garage
- Visible gaps in the spring coil
- Cables appear loose or disconnected
If you notice these symptoms, it’s time to learn how to repair garage door spring or call in an expert.
Safety Precautions Before Repair
Garage door springs are under tremendous tension, making them dangerous to handle. Follow these safety measures:
- Disconnect the garage door opener
- Wear safety goggles and gloves
- Keep children and pets away from the workspace
- Use proper tools such as winding bars, not improvised ones
- Never attempt repairs without full understanding of the risks
Tools You’ll Need
Before starting the repair, gather the necessary tools:
- Winding bars (for torsion springs)
- Adjustable wrench
- Socket set
- Ladder
- C-clamps or locking pliers
- Replacement spring
Having the right tools ensures that the process of how to repair garage door spring goes smoothly and safely.
Step-by-Step Guide: How to Repair Garage Door Spring
Step 1: Disconnect the Power
Unplug the garage door opener to prevent accidental activation during repair.
Step 2: Secure the Door
Clamp the door tracks with C-clamps to keep the garage door in place.
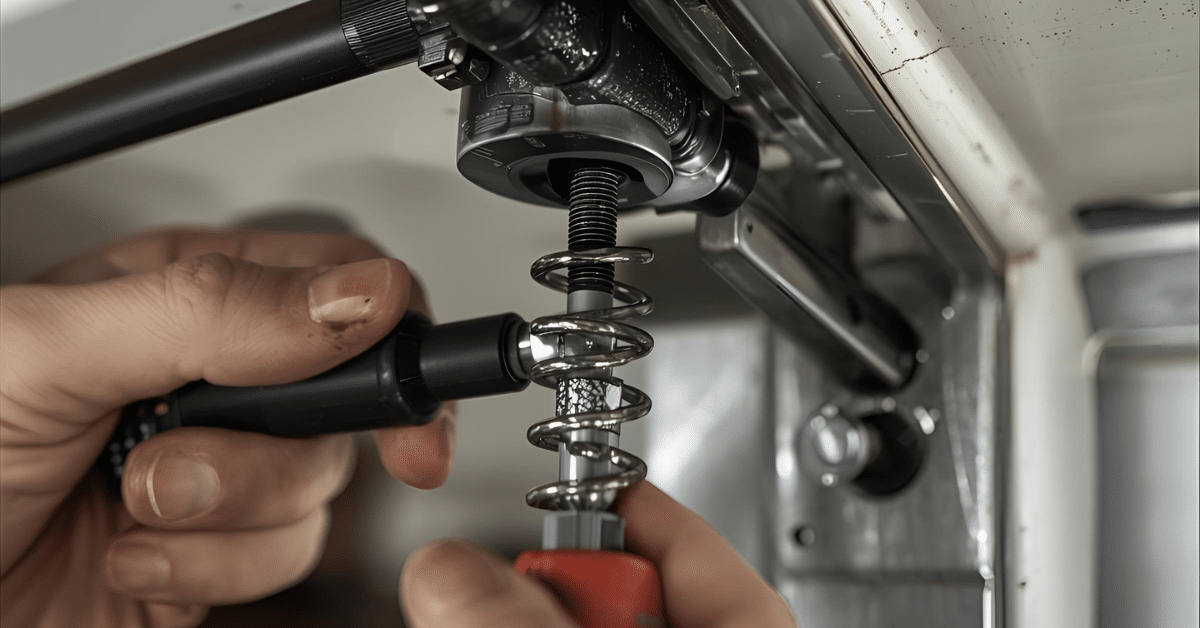
Step 3: Release Tension (Torsion Springs)
Insert winding bars into the winding cone and carefully unwind the spring one quarter turn at a time. Keep a firm grip to avoid slippage.
Step 4: Remove the Broken Spring
Loosen the set screws on the winding cone and slide the spring off the torsion tube or remove the extension spring from its brackets.
Step 5: Install the New Spring
Slide the replacement spring into place. For torsion springs, ensure the correct orientation (left-hand or right-hand).
Step 6: Tighten and Rewind
Using winding bars, rewind the torsion spring in quarter turns until proper tension is reached. For extension springs, reconnect cables and pulleys.
Step 7: Test the Door Balance
Remove the clamps and carefully lift the door halfway. If it stays in place, the spring is balanced. If not, adjust tension accordingly.
Common Mistakes to Avoid
When figuring out how to repair garage door spring, many homeowners make critical errors, such as:
- Using screwdrivers instead of winding bars
- Installing the wrong size spring
- Forgetting to secure the door before repair
- Ignoring professional help when needed
Avoiding these mistakes will save you time, money, and potential injury.
When to Call a Professional
While this guide explains how to repair garage door spring, not every repair should be a DIY project. If you lack the tools, confidence, or experience, contacting a licensed technician is the safest choice. Professional repair ensures:
- Correct spring type and size installation
- Balanced door operation
- Reduced risk of injury
- Longer lifespan of your garage door system
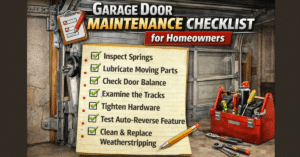
Maintenance Tips for Longer Spring Life
After successfully learning how to repair garage door spring, proper maintenance can extend its lifespan:
- Lubricate springs with garage door spray every 3–4 months
- Inspect cables and pulleys regularly
- Replace springs in pairs for balanced performance
- Schedule annual garage door inspections
Final Thoughts
Dealing with a broken spring can be intimidating, but with the right tools, safety precautions, and this detailed guide, you now have a clear understanding of how to repair garage door spring. Whether you decide to attempt the repair yourself or call in an expert, addressing the issue promptly ensures your garage door continues to function smoothly and safely.