Choosing the right seal type for your garage door is essential to protect your space from dust, water, pests, and temperature changes. Whether you’re installing a new garage door or replacing a worn-out seal, selecting the correct garage door bottom seal ensures a tight fit and long-term performance.
Poor sealing leads to energy loss, water damage, and unwanted intruders like insects or rodents. In this guide, you’ll learn how to identify the best garage seal type for your door and climate, how to ensure a proper fit, and what material works best for your specific needs.
What Is a Garage Door Seal?
A garage door seal, also known as garage weather stripping, is a protective strip attached to the bottom, sides, or top of a garage door. It prevents air drafts, rainwater, dirt, and pests from entering your garage. Over time, seals can wear down, flatten, or crack, leaving gaps under the door.
Replacing or installing the right garage door seal will help:
- Improve garage insulation
- Prevent pest entry
- Block water intrusion
- Reduce noise and debris
- Lower heating and cooling costs
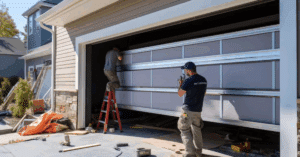
Step 1: Identify Your Garage Door Type
The first step in choosing the right seal is knowing what type of garage door you have. This affects both the installation process and the compatible garage door bottom seal style.
- Wooden Garage Doors: Often require flat seals that are nailed or screwed directly onto the door bottom.
- Steel or Aluminum Doors: Typically feature a metal retainer channel for T-end, bead, or bulb seals to slide in.
- Commercial Garage Doors: May use brush-style or industrial rubber seals for frequent use and durability.
Knowing your door material and construction is crucial to ensure your new garage weather seal fits perfectly.
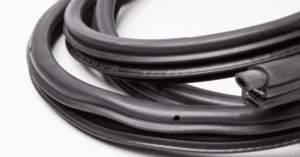
Step 2: Understand the Main Types of Garage Door Seals
Not all garage door seal types are created equal. Here’s a breakdown of the most common styles and their uses:
T-End Seals: Feature a T-shaped edge that slides into a double-channel retainer. Common in steel or metal garage doors.
Bulb Seals: Shaped like a tube, bulb seals compress easily, making them ideal for uneven garage floors. They offer great flexibility and weather resistance.
Beaded Seals: Round ends that lock into circular tracks on the door. These seals are often used in commercial garage doors.
Flat Seals: Simple rubber or vinyl strips attached directly to the door with nails or screws. Typically used for wooden doors.
Threshold Seals: Installed on the floor instead of the door. Perfect for garages where water flows inward from the driveway.
Each of these garage seal types is designed for a specific track or surface condition, so always check your garage door’s seal channel before purchasing.
Step 3: Assess Your Floor Condition
Your garage floor’s surface plays a key role in seal effectiveness. An uneven floor requires a flexible seal—typically a bulb seal—that can compress to fill gaps. If your floor is level, a T-end seal or flat seal may be sufficient.
For garages prone to flooding or water entry, combining a garage door threshold seal with a bottom seal offers superior protection.
Step 4: Choose the Right Seal Material
Another critical factor is selecting the right material for your garage door insulation seal:
- Rubber: Highly durable, flexible in cold weather, and ideal for long-term use.
- Vinyl: Budget-friendly, UV resistant, and moderately durable.
- Silicone: Excellent for extreme temperatures but typically more expensive.
- Brush Bristles: Best for commercial doors or sliding mechanisms where flexibility is key.
If you live in a cold or wet climate, go with a heavy-duty rubber or silicone option. These materials last longer and perform better in harsh conditions.
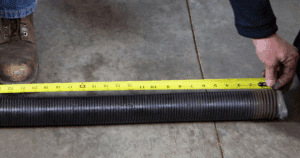
Step 5: Measure Correctly for a Perfect Fit
Before buying your new garage weather stripping, measure the width of your garage door and the depth of the seal channel or retainer. Most garage door bottom seals come in standard sizes, but accurate measurements prevent fitting issues. Cut the seal to size and make sure it aligns properly before installation. A poorly sized seal can cause air leaks or door malfunctions.
Step 6: Consider Full Perimeter Sealing
While most people focus on the bottom seal, don’t ignore the sides and top of the garage door. Adding garage door side seals and top weather stripping helps fully insulate your garage. A complete perimeter seal keeps your garage cleaner, drier, and more temperature-controlled year-round.
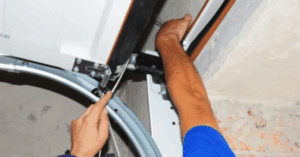
Installation Tips for Maximum Performance
Once you’ve selected the right seal, installation is the next step. Many modern seals slide into tracks and are easy to DIY with basic tools like a utility knife, screwdriver, and lubricant.
Make sure to:
- Clean the door bottom and track before installation
- Slide or screw in the seal securely
- Trim off any excess length
- Test the door for light or gaps after sealing
Regular inspection and cleaning of the seal area will extend the life of your garage door insulation seal.
Final Thoughts
Choosing the right seal type for your garage door is a smart move for any homeowner looking to boost energy efficiency and keep their garage protected. Whether you’re dealing with pests, flooding, or cold air drafts, the correct garage door bottom seal makes all the difference.
Start by identifying your door type, choose the right seal material, and make sure it matches your floor and climate conditions. With proper installation and maintenance, a good garage door seal can last for years, improving both comfort and savings.
So don’t wait until water or pests sneak in—seal your garage right the first time with the best fit for your needs.