If you’re tired of juggling a clicker, you’re not alone. HomeLink is built into many cars and can control your garage door with a button on your visor, mirror, or overhead console. The setup is usually quick, but it can get confusing because LiftMaster openers use different “Learn” button colors and security systems.
This guide shows you exactly how to connect LiftMaster to HomeLink step by step, including the two-stage programming most LiftMaster rolling-code openers require. You’ll also get simple troubleshooting if HomeLink won’t pair, plus tips to avoid common mistakes that waste time.
Before You Start: What You’ll Need
To program HomeLink successfully, you typically need:
- Your vehicle parked outside the garage (door closed is fine)
- Your LiftMaster handheld remote (even if it’s old, it helps)
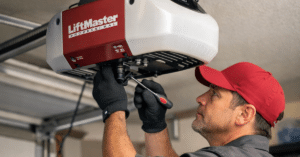
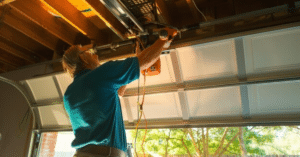
- Access to the garage door opener motor unit (where the Learn button is)
- A ladder (for safe reach to the opener head)
- A helper (optional, but makes the Learn-button step easier)
Also, take 10 seconds to locate the Learn button on the opener. It’s usually behind the light cover or near the antenna wire. The Learn button is often yellow, purple, red/orange, or green—and that color can affect the programming sequence.
Safety Notes (Quick but Important)
- Keep the garage door area clear while programming.
- Don’t stand under the door when testing.
- If your opener behaves unpredictably (reversing, grinding, heavy door), stop and address door issues first.
Programming HomeLink is safe, but testing a moving door always deserves attention.
Best Garage Door Openers for Homes
Step 1: Clear the HomeLink Button You Want to Use
If the HomeLink button has been programmed before, clear it first. This prevents “half-programmed” signals.
- Turn the ignition ON (or accessory mode).
- Press and hold the two outer HomeLink buttons (usually button 1 and 3).
- Keep holding until the HomeLink light changes (often from solid to blinking rapidly).
- Release.
This clears HomeLink’s memory (or at least the main set, depending on your vehicle). If you only want to clear one button, some vehicles support single-button clearing, but the outer-button reset method is the most reliable.
Step 2: Train HomeLink Using Your LiftMaster Remote
This is the “remote-to-car” step. You’re teaching HomeLink the remote’s signal pattern.
- Hold your LiftMaster remote 1–3 inches from the HomeLink buttons (not touching).
- Press and hold the HomeLink button you want to program.
- While holding HomeLink, press and hold the button on your LiftMaster remote.
- Watch the HomeLink indicator light:
- It usually starts slow blinking, then becomes rapid blinking or changes pattern.
- It usually starts slow blinking, then becomes rapid blinking or changes pattern.
- When the light indicates successful learning, release both buttons.
At this point, HomeLink has learned the remote signal—but most LiftMaster openers still need the next step because they use rolling code security.
Connect LiftMaster to HomeLink Using the Learn Button (Rolling Code Step)
This is the step many people skip, and it’s the main reason HomeLink “seems programmed” but won’t activate the door. Rolling code openers require you to sync the newly trained HomeLink button to the opener.
1) Press the Learn Button on the LiftMaster Opener
- On the motor unit, press and release the Learn button.
- You’ll usually see an LED turn on or a light blink, giving you a short pairing window (often about 30 seconds).
2) Return to the Car and Press the Programmed HomeLink Button
- Press the HomeLink button you programmed for about 1–2 seconds and release.
- Repeat up to 3 times (some systems need multiple presses).
- The garage door should move (or the opener light may flash to confirm pairing).
Once the door responds, you’ve successfully completed the rolling code sync and you’re done.
Learn Button Colors: What They Usually Mean
You don’t need to memorize technical standards, but Learn button color can help you troubleshoot.
- Yellow Learn button: often newer security systems; pairing is usually straightforward, but some vehicles may need an extra compatibility step (covered below).
- Purple / Red-Orange / Green Learn button: typically older generations; the same rolling-code process still applies.
No matter the color, the reliable pattern is:
Train HomeLink with remote → press Learn → press HomeLink 2–3 times.
How Long Does It Take To Install A Liftmaster Opener?
Connect LiftMaster to HomeLink Without a Remote (If You Don’t Have One)
Sometimes you don’t have the handheld remote (lost, broken, or it came with the house). You can still succeed in many cases, but it depends on the vehicle and opener.
Try this approach:
- Clear the HomeLink button you plan to use.
- Press the LiftMaster Learn button.
- In the car, press and hold the HomeLink button for 2 seconds, release, repeat up to 3 times.
If it works, great. If it doesn’t, you’ll usually need a compatible LiftMaster remote to train HomeLink first, because HomeLink often needs a “known signal” before the Learn button sync completes.
If you’re stuck, the fastest path is to get a compatible LiftMaster remote, program it to the opener, then use it to train HomeLink.
If HomeLink Still Won’t Pair: The Most Common Fixes
If you followed the steps and nothing happens, don’t assume the opener is broken. Most failures come from a few predictable issues.
1) Your remote battery is weak
Even if the remote light turns on, weak batteries can produce a poor training signal. Replace the battery and try again.
2) You held the remote too far away
Keep the remote 1–3 inches from the HomeLink area. Too close (touching) can also cause issues in some cars, so stay slightly off the surface.
3) You didn’t press Learn at the right time
Press Learn, then return to the car immediately. If the pairing window expires, HomeLink won’t be accepted.
4) You need multiple HomeLink presses after Learn
This is big: after pressing Learn, press the HomeLink button up to three times. Many systems require the second or third press to complete the handshake.
5) LED bulbs are interfering with the signal
Some low-quality LED bulbs in the opener can cause radio interference, reducing range or blocking learning. If your remote range has been poor lately, try temporarily removing the bulb or swapping to a garage-door-friendly bulb.
The Compatibility Bridge Issue (When Everything Looks Right but Still Fails)
In some combinations of newer LiftMaster security technology and certain HomeLink versions, pairing may require a HomeLink Compatibility Bridge / repeater (a small device that helps the signals “translate”).
You’ll suspect this if:
- HomeLink learns the remote (light changes correctly),
- you press the Learn button,
- you press HomeLink multiple times,
- and it still never activates the opener.
If that’s happening, ask your installer or supplier about a LiftMaster/HomeLink compatibility bridge for your opener model. Once installed, programming usually becomes easy using the same steps.
I’m keeping this general on purpose because exact compatibility depends on your opener model and your vehicle’s HomeLink generation—but the takeaway is: a bridge is a known solution when normal pairing fails repeatedly.
Pro Tips for a Clean Setup
Program all buttons in one session
If you have two doors (or a gate), clear HomeLink once and program each button back-to-back while you’re in “setup mode.”
Label what each button does
It sounds obvious, but people forget. Decide:
- Left = main door
- Middle = second door
- Right = gate
Test from different distances
After programming, test the door:
- right outside the garage
- from the driveway
- from the street (safe distance)
If range is poor, check antenna wire position on the opener (it should hang down) and consider bulb interference.
What Not to Do (Common Mistakes)
- Don’t hold the Learn button too long unless you want to erase all remotes. A long press can wipe memory on many openers.
- Don’t test repeatedly while someone is in the doorway.
- Don’t assume “rapid blinking” on HomeLink means you’re fully done—rolling code sync is still required.
Conclusion
Once you know the correct sequence, connecting your garage to your car is pretty painless. In most cases, you can connect LiftMaster to HomeLink in under 10 minutes:
- Clear HomeLink
- Train HomeLink using the LiftMaster remote
- Press Learn on the opener
- Press HomeLink 2–3 times to finish pairing
If it doesn’t work after careful attempts, you’re usually dealing with either timing, battery/range issues, interference, or a compatibility bridge requirement. Fix those, and HomeLink becomes one of the most convenient upgrades you can make.
FAQs
Q: Why does my HomeLink program but not open the garage door?
A: Most often, you skipped the rolling code step. After training HomeLink with the remote, you must press the opener’s Learn button and then press HomeLink up to three times.
Q: Do I need the LiftMaster remote to program HomeLink?
A: Often yes, especially for the initial training step. Some setups may work without a remote, but a compatible remote makes programming much easier and more reliable.
Q: Where is the Learn button on a LiftMaster opener?
A: Usually on the motor unit near the antenna wire or under the light cover. It’s commonly color-coded (yellow, purple, red/orange, or green).
Q: Why is my HomeLink range very short?
A: Common causes include a weak remote battery during training, the opener antenna tucked up, or LED bulb interference. Try replacing batteries and swapping bulbs if needed.
Q: What if my car has HomeLink but it won’t work with my LiftMaster?
A: If repeated programming attempts fail, your vehicle’s HomeLink system may need a compatibility bridge/repeater for certain opener security systems. This is a known fix when standard pairing doesn’t succeed.